Boruca Masks of Costa Rica Art Project
Mask Background Information
"When the Spaniards arrived with advanced weapons, the Borucans only had animal spirits, such as the jaguar, to guide them. In homage to the spirits that aided them, today's intricate masks are carved and painted to represent these spirits, fierce animals, devils, and also images of the local flora and fauna of their country. The Borucans have become over the years very detailed relief carvers. Relief carvings have a flat back and the image carved in three dimension, obtaining unbelievable depths, all from one piece of wood. There are three distinct styles and each tells a specific story about Borucan culture. The first is the 'diablito' or 'devil' mask, the most traditional. The second is the 'ecologica', featuring animals and plants of the rainforest. These were originated by a new generation of artists concerned about the imminent threat of their culture due to the destruction of their environment. The third, 'combinados', are the metamorphosis of both the 'diablitos' and the 'ecologica', as they represent the blending of the traditional and contemporary styles".
*Information obtained from the Boruca Website
Cultural Appreciation vs. Appropriation
Materials Needed
Cardboard box cut into 12x12 inch sheets
Toilet Paper Roll (after the quarantine I know y'all have TP rolls)
Masking tape
Scissors
Drawing paper and marker
Non-hardening modeling clay
Click HERE to order modeling clay from Amazon
Tempera or Acrylic Paint
Gesso or white tempera
To hang you mask you may tape or hot glue a paper clip on the back of the cardboard
Steps in Mask Making
1. Ask students to select the type of mask they would like to create the Diablo, the Ecological or they may choose to create a mask that represents themselves. After the mask is drawn students will color their drawing with markers.
I use Crayola washable markers for this project. I like them because they blend together really well.
You can order an individual size HERE from Amazon.
You can order a class pack HERE from Amazon.
2. This is part of my school's recycle art lesson series. We use cardboard boxes from around the school to create our Boruca masks. You will need to cut your boxes in to 12x12 inch sheets or as big as you are able to cut your boxes.
Draw out the shape you would like your mask to be.
Then cut out the mask.
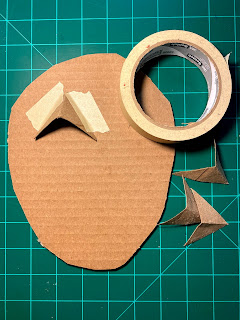
3. Next we will start adding the eyes using a toilet paper tube.
Flatten the tube and cut across at an angle.
Then cut straight across the TP tube, which will create another angle.
Do that 2 more time so you have upper eye lids and lower eye lids.
I like to make the lower eye lids smaller than the top.
Using masking tape you will attach the TP tube cut outs to your mask.
There is a flat side and a pointed side to the eye lid, make
sure the pointed side goes down towards the cardboard.
Attach the eye lids securely with the masking tape and then
rub the tape until it is flat against the cardboard.
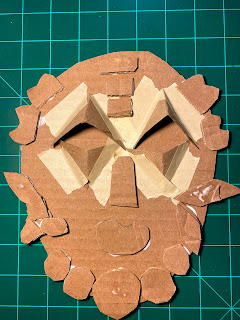
4. I have my students cut out all their parts at one time and then put them in a bag. I put masking tape on the bag with their name on it, I am able to reuse the bags this way.
Once all the parts are cut out then you can start gluing them in place.
Make sure your name is on the back with a Sharpie and then set it aside and let it dry until next class.
5. When the glue is dry poke holes in the areas you would like to later add yarn, string or raffia. Then paint the entire mask with Gesso or white tempera.
Set this aside and allow the white to dry.
6. Now the exciting part....add some color.
I use tempera paint at my elementary school for clean up and economical reasons but the mask in this example is in acrylic. I would use acrylic if I could because I like the look.
After the paint dries add some yarn, string or raffia.
I found a feather and I added it in too.
7. Add the eyes
Make sure you put a drop of glue between the clay and the cardboard so the eyes will stick in place.
I use Craftsmart non-hardening modeling clay.
The package in the photo will create all 5th grade Boruca masks, a 4th grade project and a 3rd grade project. I do order extra white clay for the eyes. You can have the kids use other colors than white for the eye background.
Click HERE to order modeling clay from Amazon
I have a class set of stands, which are just cut 2x4 boards and dowels.
I use masking tape to the tape the masks to the stand and that way I can reuse the stands.
This image is from the Boruca website.
You can find more information about the Boruca culture, weaving, natural dyes and how to buy your own make HERE
If you have any questions or need help with this project please email me at
artroomblog@yahoo.com


No comments:
Post a Comment