This is a fun and amazingly easy way to introduce your kids into printmaking.
The first step is to print the table cloth for your Fern Vase
I use rolls of shelf liner that you can get in different patterns from the dollar store or click HERE to get it on Amazon.
I cut it to paper width size, which is 9 x12 inch 90 lb white paper. I cut the shelf liner or "table cloth" to 9 inches wide. I cut different size hights so the kiddos can make their own choices for table cloth sizes.
On printing day I set up the inks on one table. I use cheep place mats you can get at Walmart or click HERE to get them on Amazon.
I use old magazines and phone books, which I call printing pads...(do they still make phone books anymore) to print on. Every one gets their own "printing pad".
I use a lighter color to print the table cloth with. As long as you stay away from purple or black you will be okay.
I teach the kids to roll in brayer size squares. I repeat (like 1,000,000 times) "the square is your friend". I also teach them to roll the brayer over the ink in only one direction...always forward, never backward. In other words, no rocking back and forth of the brayer, which would cause the ink to be distributed only on one side.
Right below the "square" they make another "square" to even out the ink on the brayer before they print.
We ink the table cloths on the printing mat (magazine or phone book).
Place the table cloth inked side down on the 9 x12 inch white printing paper. Place a sheet of wax paper over the surface to be printed and then use a baron (or an oversized clean brayer) to rub over the wax paper. The wax paper keeps hands and barons (or brayers) clean. I use oversized brayers to rubbing the printing surface because it just seems easier for the kids than a barons.
Now pull off the wax paper and the printing foam and there you have it... the table cloth for your fern vase. After you print your table cloth just toss it in the sink and wash it for next time.
I have had this set of table cloths for a few years now.
I teach the kids to automatically turn the page to a clean sheet on their printing mat after they ink what ever it is that they are inking.
a new clean sheet to ink on
The next step is the vase. I use foam sheets that you can get at the Dollar Tree or on line by the case at dollartree.com or click HERE to order from Amazon. I simply have them fold the sheet in 1/2 and cut out their own vase. Remember to save the scraps of foam for another project.
I keep all my foam scraps in a container to use on other projects.
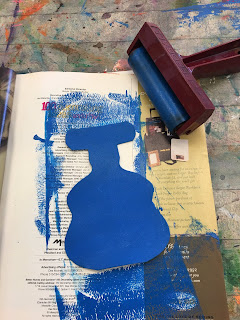
Use a darker color to print the vase...red, purple, etc. This helps to cover up the table cloth under the vase when you print it.
Remember "the square is your friend".
Ink the vase on the printing pad.
Remember to turn the page on the printing pad...
Place the inked vase on the paper, inked side down. Place the wax paper over the vase and use a clean brayer or a baron over the wax paper.
and there you have it...you printed vase.
Next are the ferns... I asked the kids to make 2 different ferns using the foam sheets.
You can use a hole puncher to make some texture and also a pen to make lines in the foam.
I use green for the ferns but you can use any color you like.
You can add a second color if you have time. I just mix the colors right on the place mats.
Ferns!!!
More ferns...
and even more ferns...
Now for the last step...
Using Scratch Foam trace around the vase.
Click HERE to buy Scratch Foam on Amazon.
You will need to press designs into the styrofoam. I use a Sharpie pen with the top on.
You want to press out a lot of designs so that the base color of the first printed vase will show through when printed over.
The Scratch Foam top vase should be printed in black.
You can click HERE for Speedball brayers on Amazon.
Place the inked Scratch foam sheet directly on top of the vase you already printed. Put the wax paper over the Scratch foam sheet and use your baron or brayer over the wax paper.
Then pull up the wax paper and the Scratch foam sheet...
The final piece!
Have fun...


No comments:
Post a Comment